Tips for backcountry navigation using topo and how to use a topo map to find mule deer

When it comes to navigating on a Western hunt, there are certain aspects you can’t plan for. Sometimes, we leave the familiar roads and trails when chasing animals or navigating to remote places. In these situations, we have to find our own way.
When your hunt goes off the beaten path, land navigation becomes just as much about safety as much as pace. A detailed map is paramount in these situations because a hunter can confidently plan a route from point A to point B.
A dangerous situation for a hunter is getting stuck at the top or bottom of a cliff. If that happens, they have to go back and find another way, burning precious hunting time. If you hunt long enough off the trail, you’re a candidate for this to happen.
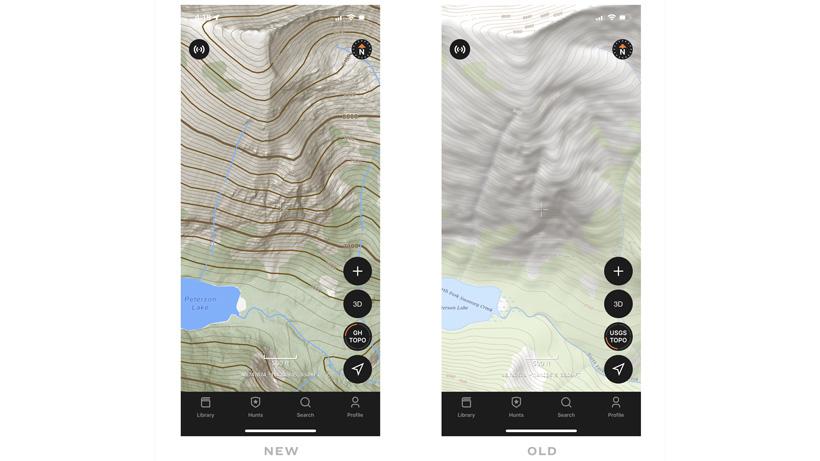
One of the ways to prevent this is by using a highly detailed topographic map. Contour lines on a topo map follow the mountain at each elevation level. GOHUNT's hunting maps show changes in elevation with lines that are 40’ apart. Each line represents a 40’ increase or decrease in elevation.
Closer lines on a topo map mean steeper areas with more elevation changes in a shorter horizontal distance. A topographic map represents cliffs as areas with tightly spaced lines.
Topo lines may not accurately represent every detail of a mountain because of challenges in measuring elevation in cliffed regions. Topo maps show elevation in detail, but must also be clear and useful for hunters navigating.
This is where hillshading becomes imperative — and has been given a major enhancement in the new topo map from GOHUNT. Hillshading imitates sunlight to highlight map details and provide a clear view to users. In the case of GOHUNT’s topo map, this draws out fine details of the map that need to be considered when planning and navigating in the backcountry.
In the before and after photos below, the newer map illustrates fine details in the relief of the earth, which tell a hunter that this area is, in fact, a cliff and needs to be avoided. Other topographic maps that are not purpose-built for hunting may find these details unnecessary; however, for a hunter, they may make all the difference in the world.
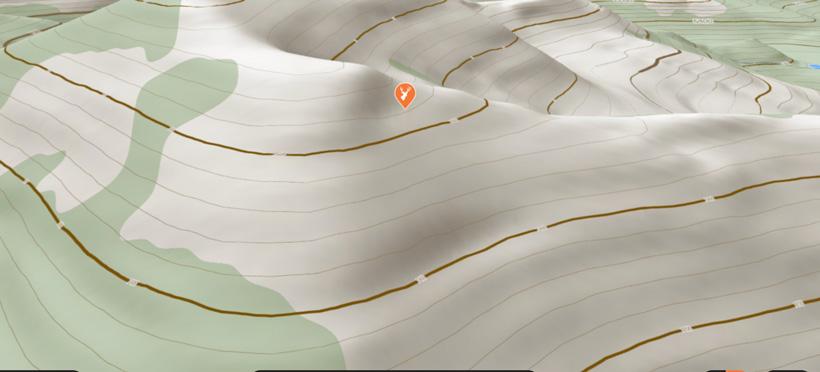
Cliffed-out areas can be used for more than just navigation. Hunters aiming to score a high country mule deer should be using these map features to find areas on the top 500’ to 1,000’ of a mountain to narrow down where a big mountain buck could live.
In the screenshot above, a topo map without exaggerated hillshading may not emphasize the cliff band at the top of a mountain where a mule deer may find refuge in the hot summer and early season months. I have personally seen mule deer bucks bedded in this spot and now I not only know what general area to focus on, but how to find similar spots on a map for backup plans.